Welcome to our comprehensive guide on the HDVX9-AS V3.0 firmware software download! If you’re looking to upgrade or troubleshoot your HDVX9-AS V3.0 LED TV board, you’ve come to the right place. We’ll walk you through everything you need to know about this versatile TV control driver board and provide you with the latest firmware download link. Let’s dive in!
What is HDVX9-AS V3.0?
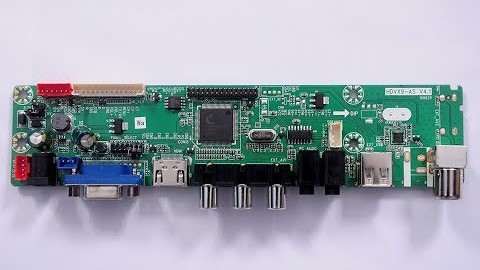
The HDVX9-AS V3.0 is a universal jumper LCD LED TV control driver board. Designed for versatility and ease of use, it supports a wide range of resolutions and panel power supplies through simple jumper settings. Whether you’re dealing with different panel resolutions or power requirements, the HDVX9-AS V3.0 makes it easy to adapt without needing separate firmware installations.
Key Features
- Model Number: HDVX9-AS V3.0
- Main Chipset: TSUMVV59XC-Z1
- Display Format: Maximum 1920×1080@60Hz
General Specifications
- TV System: PAL/SECAM/NTSC
- Panel Interface: Single channel or Dual channel LVDS
- Key Button Functions: CH-/CH+/MENU/VOL-/VOL+/Source/Power
- Multi-Language OSD: Yes
- Input/Output Ports: HDMI, VGA, AV, USB, RF TV interface, and Earphone Out
- Audio Output Power: 2 x 2 Watt (8 ohm)
- Panel Voltage: +3.3V/+5V/+12V DC (jumper setting)
- USB Port: Yes (supports firmware upgrade and multimedia playback)
- Supported USB File Formats:
- Audio: Mp3, wma, m4a/aac
- Video: avi, mp4, ts/trp, mkv/mov, mpg, dat, vob, rm/rmvb
- Picture: Jpg, jpeg, bmp, png
- Text: txt
- IR Control: Yes (remote control compatible)
Electrical Parameters
- Working Input Voltage: DC +12 Volt
- Maximum Current: 2000mA (without panel)
- Standby Power: <0.2W (for motherboard only)
- Maximum Current for USB: 500mA
Step-by-Step Firmware Installation Guide
- Download the Firmware: Download the firmware from the links below (make sure to use the correct and latest firmware version to avoid any compatibility issues).
- Prepare Your USB Drive: Format a USB drive to FAT32 and copy the downloaded firmware file onto it.
- Insert the USB Drive: Plug the USB drive into the USB port of the HDVX9-AS V3.0 board.
- Enter Factory Service Mode:
- Press the Menu button on your remote.
- The menu will appear on the screen. Press the number keys 8, 8, 9, 6 in sequence.
- A service menu will appear. Select SYSTEM SETTING and press enter.
- Navigate to Panel Setting and adjust as necessary.
- After the settings are correct, press ESC to exit.
- Complete the Update: Follow on-screen instructions to complete the firmware update process. Ensure the TV remains powered on and do not remove the USB drive until the update is complete.
HDVX9-AS V3.0 Firmware Software Download Links
Important Notes
- Backup Your Data: Before updating the firmware, ensure you have backed up any important data.
- Follow Instructions Carefully: Incorrect installation can lead to hardware malfunctions.
- Seek Help If Needed: If you’re unfamiliar with firmware updates or encounter any issues, consult the user manual or seek professional assistance.
Why Choose HDVX9-AS V3.0?
The HDVX9-AS V3.0 stands out for its user-friendly design and robust functionality. Whether you need to adjust panel resolutions or power settings, this board simplifies the process with its versatile jumper settings. Plus, the broad range of supported multimedia formats ensures a rich and flexible viewing experience.
Conclusion
Updating your HDVX9-AS V3.0 firmware is a breeze with our comprehensive guide. By following the steps outlined above, you can ensure your TV is running the latest software, providing optimal performance and compatibility. Happy viewing!
If you have any questions or need further assistance, feel free to leave a comment below. Stay tuned for more updates and helpful guides!