Hey there, tech enthusiasts! Ready to get the most out of your HDVX9-AS V4.1 and HDVX9-AS V4.2 LED TV boards? Whether you’re a tech newbie or a seasoned pro, we’ve got you covered. Dive into this comprehensive guide to downloading and installing the latest firmware software for these versatile control driver boards. Let’s get started!
What Makes HDVX9-AS V4.1 Special?
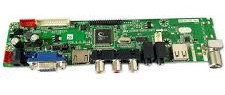
The HDVX9-AS V4.1 is a universal jumper LCD LED TV control driver board, designed to make your life easier. Here’s why it’s awesome:
- Versatile Resolutions: No need for separate firmware for different resolutions. Just use the jumper settings to select the panel power supply and resolution.
- User-Friendly: With a straightforward jumper setting, you can easily switch between resolutions without hassle.
- All-in-One Solution: It comes with built-in software for all resolutions, making it incredibly convenient.
Key Features and Specifications
Here’s a quick rundown of what the HDVX9-AS V4.1 brings to the table:
- Model No.: HDVX9-AS-V4.1
- Main Chipset: TSUMVV29LU/TSUMVV59XU-Z1
- Display Format: Up to 1920×1080@60Hz
- TV System: Supports PAL/SECAM/NTSC
- Panel Interface: Single or dual channel LVDS
- Input/Output Ports: HDMI, VGA, AV, USB, RF TV interface, and Earphone Out
- Audio Output Power: 2 x 2 Watt (8 ohm)
- Panel Voltage: +3.3V/+5V/+12V DC (selectable via jumper)
- USB Port: Yes, supports firmware upgrades and multimedia playback
- USB File Formats Supported:
- Audio: Mp3, wma, m4a/aac
- Video: avi, mp4, ts/trp, mkv/mov, mpg, dat, vob, rm/rmvb
- Picture: Jpg, jpeg, bmp, png
- Text: txt
Electrical Parameters
- Working Input Voltage: DC +12 Volt
- Maximum Current: 2000mA (without panel)
- Standby Power: <0.2W (for motherboard only)
- Maximum Current for USB: 500mA
Factory Service Mode Instructions
If you need to tweak the settings, here’s how you can access the factory service mode:
- Press Menu: The menu will appear on the screen.
- Enter Service Code: Press the number keys 8, 8, 9, 6 to bring up the service menu.
- Adjust Settings: Navigate to SYSTEM SETTING, then enter PANEL SETTING. Adjust the settings and press ESC once you’re done.
HDVX9-AS V4.1 / V4.2 Firmware Download Links
Ready to download the firmware? Follow these links:
Installation Guide
- Prepare Your USB Drive: Format it to FAT32 and copy the firmware file onto it.
- Connect to TV: Insert the USB drive into the TV’s USB port.
- Enter Upgrade Mode: Turn on the TV and follow the on-screen instructions to start the firmware upgrade.
Note: If you’re new to this, don’t worry! Check out our detailed guide on loading and installing software/firmware for additional help.
Conclusion
Updating your HDVX9-AS V4.1 or HDVX9-AS V4.2 firmware is a breeze with our easy-to-follow guide. Enjoy enhanced performance and new features with just a few simple steps. Happy upgrading!