
Your Hisense TV has a black screen. The most common cause is a failed backlight — not a broken panel. In most cases, you can fix it at home in under 30 minutes without touching any hardware. Work through these fixes in order, from simplest to most complex.
What Type of Black Screen Do You Have?
Before you touch anything, identify your symptom. This determines which fix to try first.
Sound works, screen is black — almost always a backlight failure. Go to Fix 3 (flashlight test) first.
No sound, no picture, standby light is on — likely an input or software issue. Start at Fix 2.
Hisense logo appears briefly, then screen goes black — T-Con board or backlight driver issue. Go to Fix 7.
Screen dims and goes black after 20–30 minutes of use — Energy Saver or Power Saver is active. Go to Fix 4 immediately.
Fix 1 — Power Cycle the TV
This solves roughly 30–40% of black screen complaints. It flushes temporary software states that lock up the display pipeline.
- Unplug the TV from the wall outlet. Not the remote — the actual power cord.
- Wait 60 seconds. Some guides say 30, but 60 seconds fully drains residual charge from the capacitors.
- While unplugged, press and hold the physical power button on the TV itself for 15 seconds. This discharges internal power faster.
- Plug back in and power on.
If the screen comes back, the cause was a software or memory glitch — no hardware issue. If it blacks out again after a few hours, check Fix 4 (Energy Saver settings).
This is the same first step used when fixing a Fire TV black screen or an LG TV black screen — it works across brands because the root cause is identical.
Fix 2 — Check Input Source and HDMI Connections
The most common non-hardware cause of a “black screen” is wrong input selection. The TV is working perfectly — it’s just showing a blank HDMI input that nothing is connected to.
Press the Input or Source button on your remote. Cycle through the inputs and look for one that shows a picture. If you find it, you’re done.
If the input is correct:
- Unplug the HDMI cable from both ends — the TV and the connected device.
- Inspect both ends for bent pins or debris.
- Reconnect firmly. HDMI connectors should click slightly when seated correctly.
- Try a different HDMI port on the TV.
- Test with a different HDMI cable if you have one.
A power surge can corrupt HDMI handshake data. After a storm or power outage, unplug every device connected to the TV, power cycle everything, then reconnect one at a time.
Fix 3 — The Flashlight Test (Backlight Diagnosis)
This test tells you in 30 seconds whether you have a backlight failure or a deeper hardware problem. Every Hisense TV owner with a black-but-sound-working situation should do this before anything else.
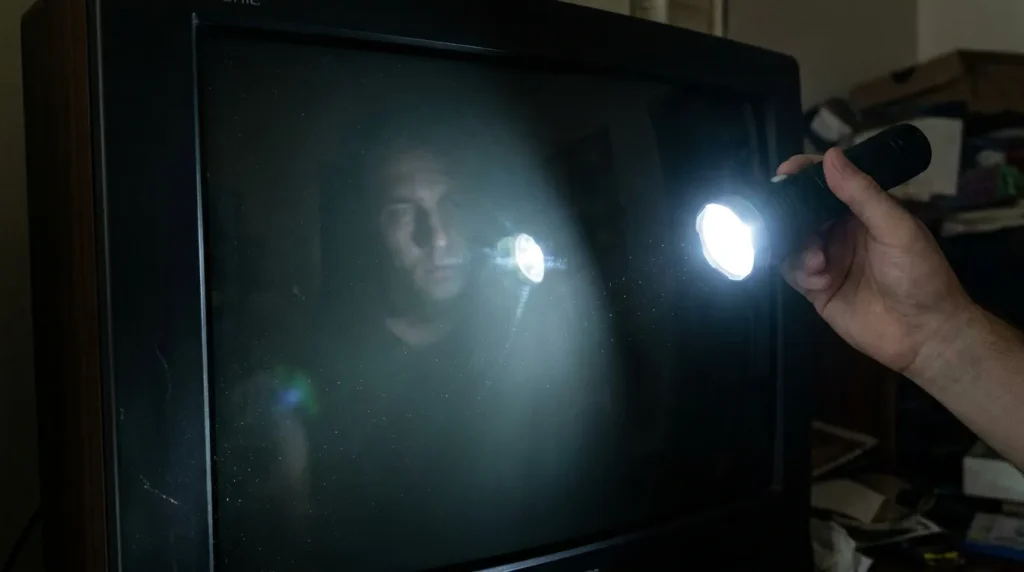
Steps:
- Turn off all lights in the room.
- Turn the TV on and wait 30 seconds for it to fully boot.
- Hold your phone flashlight about 2–3 inches from the screen, angled at roughly 30 degrees.
- Look carefully at the screen.
You see a faint image (menus, channels, anything): Backlight failure confirmed. Your LCD panel and main board are working fine. Skip to Fix 7 — Hardware section, specifically the LED backlight strip replacement.
The screen is completely uniform black: The TV is either not outputting video signal at all (try Fix 2 first) or you have a T-Con board or main board failure.
This test is the same diagnostic used for dark TV screen issues across all LED TV brands. If you can see a faint image, you have backlight failure — not a panel problem.
Fix 4 — Disable Energy Saver and Fast Start Settings
This is the most overlooked fix. Hisense TVs running VIDAA, Roku TV, and Android TV all have an Energy Saving Mode that dims or cuts the backlight during or after use. On some models, “Fast Start” creates a conflict that causes the screen to go black on startup while sound continues.
One user on iFixit reported unplugging the TV for 5 minutes, then turning off Fast Start LED and Power Saver in settings — which resolved a persistent black screen that kept returning.
VIDAA (most Hisense TVs):
Settings → Picture → Backlight → set to Manual → drag slider to maximum. Then go to Settings → General → Power → disable Energy Saving Mode and Fast Start.
Roku TV (Hisense Roku models):
Settings → TV Picture Settings → TV Brightness → change from “Low Power” to “Normal” or “Bright.” Also check Settings → System → Power → Fast TV Start and toggle it off.
Android TV / Google TV (select Hisense models):
Settings → Device Preferences → Picture → Backlight → increase to maximum. Then Settings → Device Preferences → Power → disable Auto Sleep.
After changing these settings, restart the TV and monitor over the next few hours. If the black screen was coming back after 20–30 minutes of use, this is almost certainly the fix.
Fix 5 — Update Firmware via USB
A corrupted or incomplete firmware update can kill video output while leaving audio untouched. Hisense has released firmware patches for this on multiple model lines.
- Go to Hisense’s support site on another device and search your TV’s model number. You can find your model number on the sticker on the back panel, or use our TV model number decoder if you’re unsure how to read it.
- Download the latest firmware file for your model.
- Copy it to a FAT32-formatted USB drive. Don’t put it inside a folder — root directory only.
- Plug the USB into the TV while it’s on.
- If the TV has video (even briefly on startup), go to Settings → Support → Firmware Update → Update via USB.
- If the screen is completely black, some Hisense models auto-detect the USB firmware file on boot. Try powering off, inserting the USB, then powering on. The update may start automatically.
- Let it complete without interrupting. The TV will restart automatically.
For a step-by-step walkthrough specific to Hisense models, see how to update firmware on a Hisense TV.
Fix 6 — Factory Reset
A factory reset wipes all settings and app data and restores the TV to its original state. It erases everything — Wi-Fi passwords, downloaded apps, account logins. Do this only after Fixes 1–5 have failed.
Using the remote (if the screen comes on briefly):
Press and hold the EXIT button on the Hisense remote for 15 seconds. A reset confirmation prompt will appear. Select OK. The TV will reset and restart.
Using the pinhole reset button (if screen is completely black):
Some Hisense models have a small pinhole button on the back or side panel. Use a paperclip to press and hold it for 10–15 seconds until the TV restarts. The standby LED will flash to confirm the reset has started.
Blind factory reset via remote (if no pinhole button):
Try this sequence on some Hisense VIDAA models: Press Home 5 times → Up once → Rewind twice → Fast Forward twice. This triggers a reset menu through the OS regardless of what the screen shows. Results vary by model.
After the reset, run setup from scratch. If the screen comes back, a software or firmware corruption was the cause.
Fix 7 — Hardware Diagnosis (Advanced)
If all software fixes have failed, you have a hardware problem. There are four components that cause a Hisense TV black screen. Each has distinct symptoms.
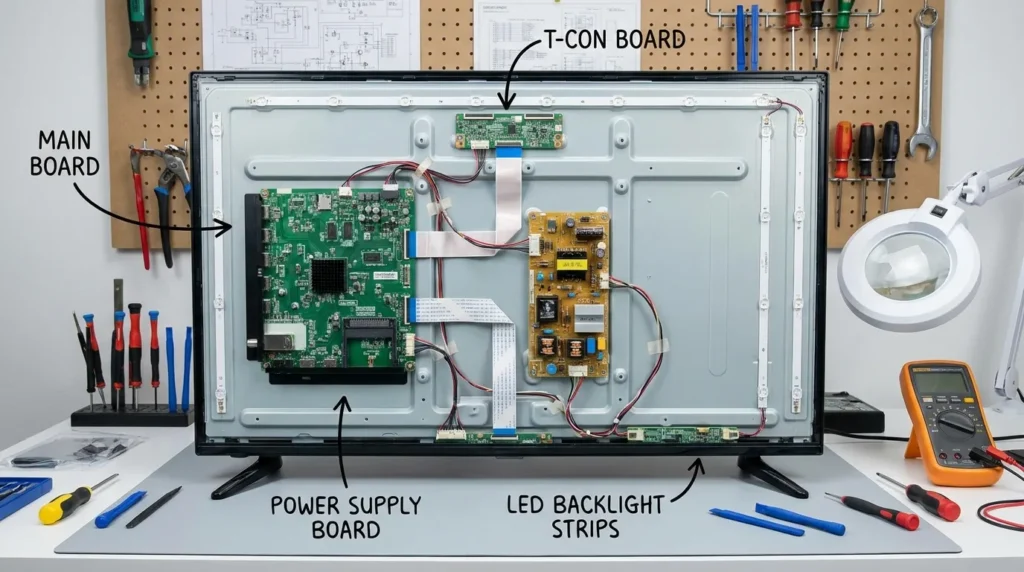
Backlight LED Strip Failure
This is the single most common hardware cause — confirmed by the flashlight test showing a faint image. The LED strips (typically 6–12 individual strips per TV) degrade over time, and one failed strip can take down the entire backlight circuit. Budget Hisense models from 2021–2023 show elevated failure rates compared to premium ULED models.
Commonly affected models: 50R6, 55H8G, 65H9G, 75H9G.
Replacement LED strips cost $20–$60 depending on model. The repair involves opening the TV, removing the panel, and replacing the strip arrays — roughly 2–3 hours of work. See our guide on how to fix a TV backlight for the full process.
T-Con Board Failure
The T-Con (Timing Control) board sits between the main board and the LCD panel. It converts video data into timing signals that activate individual pixel rows. When it fails, you typically see the Hisense logo briefly on startup then a black screen — the panel flashes for a moment, then loses timing signal.
Symptoms that point to the T-Con board specifically: screen goes black after the logo, horizontal lines appeared before the screen went black, or the flashlight test shows no image at all despite audio working.
T-Con boards on eBay run $15–$50 for most Hisense models. Before replacing the board, reseat the ribbon cables connecting it to the main board — a loose LVDS or V-by-One cable mimics T-Con failure and costs nothing to fix. Check for visible damage: burnt resistors, cracked connectors, or discoloration on the board surface.
Power Board Failure
The power supply board converts AC wall power to the DC voltages the TV needs. If the backlight driver circuit on the power board fails, no voltage reaches the LED strips regardless of whether the strips themselves are healthy.
Power board failure is typically sudden — worked yesterday, completely dead today — rather than gradual dimming. To check: with the TV open and a multimeter, verify the LED connector is receiving voltage from the power board. If there’s no voltage at the LED connector, the power board is the culprit, not the LED strips. Replacing LED strips when the power board has failed is a waste of $40–60 and several hours. Our LCD LED TV backlight voltage reference shows the expected voltage specs by board type.
Main Board Failure
If the power board supplies correct voltage to the LED connector but the backlight still won’t activate, the main board is not sending the enable signal to the backlight circuit. Main board failures also present as: HDMI ports failing to detect any connection, TV freezing during streaming, or complete failure to boot past the Hisense logo.
Before replacing the main board, verify the part number printed on the board itself — not just your TV model. Identical TV models often use different board revisions depending on manufacturing date or region. Using an incorrect board causes compatibility errors including no display or input failures.
If you want to try reading the Hisense service menu for error data before opening the TV, our Hisense TV service menu codes guide walks through the access sequence by model.
How to Read Hisense LED Blink Error Codes
When your Hisense TV won’t show a picture, count the blinks on the standby LED indicator on the front of the TV. These blink patterns point to specific failed components:
2 blinks — power supply issue; check the power board
3 blinks — backlight failure; confirms LED strip or driver circuit problem
4 blinks — main board communication error
6 blinks — panel or T-Con board fault
Blink counts vary slightly between model lines. If your TV is blinking in a pattern you can’t identify, use our TV error code lookup tool to match the blink sequence to the specific fault for your Hisense model.
Repair Cost vs. Replacement: When Does It Make Sense?
Repair costs for a Hisense TV black screen:
- LED backlight strip replacement (DIY): $20–$60 in parts
- LED backlight strip replacement (shop): $80–$150 labor + parts
- T-Con board replacement (DIY): $15–$50 in parts
- Power board replacement (DIY): $30–$80 in parts
- Main board replacement (DIY): $40–$120 in parts
- Full professional diagnosis + repair: $100–$250
The general rule: if the repair cost exceeds 50% of what a comparable replacement TV costs, replace it. If your Hisense is 5 or more years old and needs a main board or panel replacement, replacement is almost always the smarter financial decision. See our TV screen repair costs guide for a full breakdown by repair type.
Hisense warranty note: Hisense TVs carry a 1-year limited warranty in most regions. If your TV is under warranty, call Hisense support before attempting any DIY repairs — opening the TV voids the warranty.
Frequently Asked Questions
Why does my Hisense TV show the logo then go black?
This almost always points to a T-Con board or backlight driver issue. The main board boots successfully (hence the logo), but the timing signal or backlight enable signal fails immediately after. Reseat the ribbon cables between the T-Con board and the main board before replacing any parts — a loose cable is the cause in a significant number of cases.
Can I fix a Hisense TV black screen myself?
Yes, for most causes. Power cycling, adjusting settings, firmware updates, and factory resets are all DIY. LED strip replacement and T-Con board swaps are intermediate DIY repairs — manageable if you’re comfortable opening electronics. Power board and main board issues are also DIY-repairable but require a multimeter and basic electronics knowledge. If you’ve never opened a TV before, a TV repair technician is the safer choice for hardware faults.
My Hisense TV has no picture but I can hear sound — what’s wrong?
Sound with no picture is the classic backlight failure symptom. The audio circuits, main board, and speakers are all functioning. Only the backlight has failed. Run the flashlight test in Fix 3 to confirm, then proceed to Fix 7 for hardware repair options.
How do I factory reset a Hisense TV when the screen is black?
Use the pinhole reset button on the back or side panel with a paperclip — hold for 10–15 seconds. Alternatively, try the blind remote sequence: Home ×5 → Up ×1 → Rewind ×2 → Fast Forward ×2 on VIDAA models. For more reset options across all smart TV types, see how to reset a smart TV without a remote.